Maul of America Rules
Welcome shoppers to the MAUL OF AMERICA! If you’re looking for blue light specials and sidewalk sales you might be in for a shock. The only specials you’re likely to find here are Saturday Night specials (or if you’re really lucky, a flame-thrower).
You see, this isn’t an ordinary mall, it’s the Maul of America. It’s where that saleswoman with the glazed-out look isn’t just your typical teen age girl; she’s actually a zombie who’s looking for a bite to eat namely you!).
To recap what you probably already know, zombies are dead people come back to life who, by some strange force, endlessly pursue humans in an attempt to eat their flesh (pretty cool so far, huh?). Why they do this we don’t know, but it makes for great entertainment watching panic stricken characters trip over each other as they try to get away from the pursuit of the relentless undead legions.
The best thing about zombie movies is that after one of the main characters is inevitably captured and mauled by the zombies, the character joins the ranks of the undead. Now he is hunting down his former friends. (Hey Bob, I’m glad to see you escaped. Bob, why do you have that strange look in your eyes? Bob? NOO0000…).
Components
In the box you should have received the following components:
- this rulebook
- 5 Shopper tokens
- 25 zombie tokens
- 3 separate decks of cards (Shopper, Zombie, Search)
- 4 double-sided Maul sections
- 2 six-sided dice (hereafter referred to as 1d6 for one die and 2d6 for two dice)
Object of the Game
The object of the game is to be the first Shopper to accumulate 4 different types of equipment and escape from the Maul within a two hour time limit. The equipment necessary is: a weapon, ammunition (hereafter referred to as ammo, food, and a Medkit. Barring this, a player may also win by accumulating any 7 pieces of equipment and escaping within the time limit. If no Shopper meets these conditions or if all Shoppers have been killed, then the Zombie Controller wins the game. See Escaping.
Setting Up the Game
First, decide who will be Shoppers trying to escape from the Maul of America and who will be the Zombie Controller. There is only a single Zombie Controller; all other players will be Shoppers. The choice as to who will be the Zombie controller is left to the players. They can nominate another player, volunteer, or roll dice to determine who will be the Zombie Controller.
The next step is setting up the Maul of America. The Zombie Controller chooses one of the eight different Maul sections available (four two-sided sections), and places it on the table. The Shoppers (as a group then collectively choose a Maul section and place it on the table so that an arrow on the section they are placing lines up with an arrow on the section already placed. If the Shoppers cannot agree within two minutes, the Zombie player is allowed to select instead. The third map is placed by the ZC, and the final map is placed by the shoppers following the above guidelines for placement. Maul sections may not overlap one another. This allows for an almost endless number of Mauls to choose from, making sure that no game is the same as the last!
Once the Maul has been built, starting with the Shopper to the Z’s left and proceeding around the table, Shoppers choose a Shopper token and place it on any Food Court square within the Maul. Once this is done, the Zombie Controller places a number of zombies equal to the number of Shoppers anywhere in the Maul that is at least 5 squares away from all Shoppers.
There are five players. Since one is the Zombie Controller, there are four Shoppers. After the Shoppers are placed, the ZC may place four zombies inside the mall.
After making sure all three decks have been thoroughly shuffled, deal three Shopper Cards to each Shopper and three Zombie Cards to the Zombie Controller.
The game is now set up and the action is ready to start….time to finish your meal and get out of the Food Court. The game begins with the Shopper to the Zombie Controller’s left taking the first turn. Play then proceeds around the table in a clockwise direction.
Once the first player has rolled the dice, the two hour countdown begins.
Gameplay - Shoppers
DETERMINE ACTIONS
At the beginning of his turn, a Shopper rolls 2d6 to determine how many actions he has to spend for the turn. This die roll is modified by -1 for each wound the Shopper has sustained. Any result less than a 2 is considered a 2.
Bob rolls 2d6 for actions and rolls an “8”. Bob has sustained two wounds (we told him the Taco Hell burrito was not a real weapon) and therefore his total actions for the turn is 6(8-2=6).
ROLLING A “7”
Whenever a shopper rolls a “7” for his number of actions, he immediately receives a Shopper card. In addition, the Zombie Controller immediately receives the top card of the Zombie deck, but may receive a maximum of 1 card per turn this way.
Shopper 1 rolls a “7” for her actions. She receives a Shopper card and the Zombie Controller receives a Zombie card. Shopper 2 also rolls a “7” and receives a Shopper card. The Zombie Controller does not receive a card; he has already received a card between his turns. He will have to wait until after his next turn to be eligible to receive a card again.
PLAYING CARDS
Unless the card says differently, you may only play cards during your own turn. You may play any number of cards that you wish or you may opt to play no cards at all.
SPENDING ACTIONS
In order to do anything, shoppers must spend actions. You may spend as many actions in a turn as you wish up to the maximum available. You may spend less than the number rolled, but you may not carry over actions from one turn to the next, nor may you give or trade actions with another Shopper. The following are allowable actions:
Move - By spending an action a Shopper may move one square in any direction; up, down, sideways or diagonal. Note: it is NOT permissible to move diagonal when going around a corner or through a doorway.
By spending two actions a Shopper may move through a display window designated by the dashed lines.
It is permissible to move through a square containing another player or Zombie as long as the Shopper does not end his turn in the square. The only action a Shopper may make while in a square containing someone else is a move action. SPECIAL: When moving into a square that contains a zombie, the Zombie controller gets a free attack. He rolls a d6. If he rolls a “6”, you sustain a wound (see Wounds). If the result in anything else, you have managed to dodge the zombie! This wound cannot be countered by playing a card.
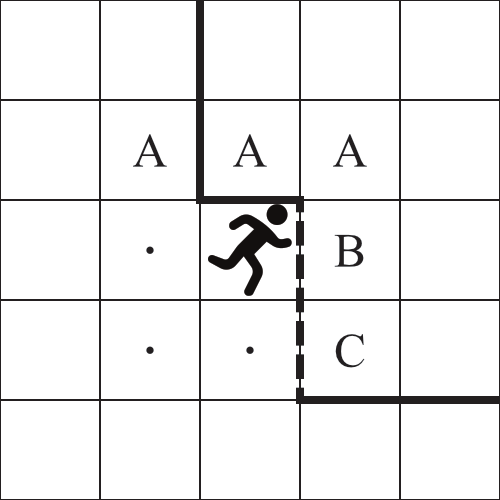
Moving to “A” is not allowed. Moving to “B” or “C” would take 2 actions. All other squares would require 1 action.
Attack - A Shopper may make an attack for one action. This can be a hand-to-hand attack in which case the zombie must be in an adjacent square OR it can be a ranged attack (assuming you have found the proper equipment). The base chance to hit in Hand-to Hand combat is a roll of a 5 or 6 on 1d6. This can be modified with cards and weapons. The base chance to hit with a ranged attack is determined by the weapon itself and is listed on the appropriate equipment card.
Shoppers are NEVER to attack another Shopper. This applies to weapons that affect more than one square as well.
Chuck wants to fire his flame-thrower at a group of Zombies but notices that another Shopper would be hit as well. If he wishes to fire on the group of zombies he will either have to re-aim so as to not hit the shopper, move to get a better firing angle, or not fire at all and curse Buffy for getting in the way.
It is not permissible to attack diagonally through a doorway or around a corner, or to attack through walls. This applies to any form of attack.
Shoppers may attack through display windows with no penalty. This applies to both hand to hand attacks and ranged attacks. Display windows are designated with a dashed border.
Out of Ammo? - If a weapon runs out of ammunition, the Shopper must discard that weapon card. However, if the shopper has an AMMO card, the Shopper may choose to discard the AMMO card instead. In that case, the Shopper keeps his handy-dandy weapon.
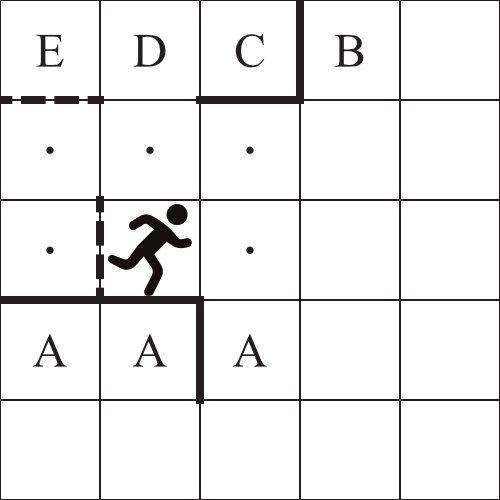
Attacking “A” is not allowed. All other adjacent squares are eligible to be hit. Ranged weapons can not hit “B” or “C.” “D” and “E” would be eligible to be hit by ranged weapons.
Search - By spending an action, a Shopper may search a square. The only squares that are allowed to be searched are the squares marked with an “?”. When a square is searched, the player immediately takes the top card from the Search Deck and turns it over. If it is a piece of equipment he places it in front of him; it can be used immediately. If it is a Zombie card, the ZC places the number of zombies specified adjacent to the searching Shopper (all zombies must be placed in the same room as the Shopper). If there are more zombies than adjacent squares, the excess zombies are not received.
A Shopper may not search the same square again until he has performed a Search action on at least one other eligible Search square.
Exchange Equipment - If at any time during his turn a Shopper is adjacent to another Shopper, she may spend an action to trade equipment with the other shopper.
Both Shoppers must agree to the exchange or else there is no trade. The shoppers are free to exchange any or all of their equipment, but note that only Equipment is allowed to be exchanged. Shoppers may not exchange Shopper cards.
Use Medkit - If a shopper has a Medkit he may spend an action to use the Medkit. The Medkit is then placed on the discard pile. All wounds she is suffering now disappear.
SPECIAL
If at any time a Shopper begins his turn in a Food Court square he may, if he desires, spend all of his actions to recover one wound he has sustained. The Shopper may not spend any other actions that turn.
Sustaining Wounds
While all Shoppers begin the game healthy, it is highly likely that they will sustain wounds over the course of a game. Being that Zombies are out to kill you and are rather single-minded in their pursuit, there are only so many wounds you can endure before you succumb to the Zombies. To reflect this, a Shopper may survive with up to 3 wounds. Any wound after the 3rd results in the player being eliminated from the game. Of course it is possible to heal wounds, which lowers the number of wounds sustained accordingly.
Jim has sustained 3 wounds and is on the verge of death. He uses a Medkit as a last gasp and recovers all wounds sustained. He now can sustain another 3 wounds. Now it’s time to find that flamethrower and blow this popsicle stand.
Wounds can either be noted on a piece of paper or you can use a d6 set with the number of wounds showing. There are no penalties for wounds other than the decrease in the number of available actions.
Gameplay - Zombie Controller
DETERMINE ACTIONS
Each zombie automatically receives four actions during the Zombie Controller’s turn.
There is no need to roll for the number of actions available each turn unless the ZC plays a Zombie card.
RECEIVE REINFORCEMENTS
The Zombie Controller receives 1 zombie reinforcement each turn for each Shopper still alive.
There are 3 Shoppers still alive at the beginning of the Zombie Contoller’s turn. He therefore receives 3 zombies as reinforcements.
These reinforcements must enter the board from any Maul exit, thus their first action must be used to move into the Maul.
Reinforcements may come in as a group or they may be brought in from separate entrances. Zombies may enter the board at any designated exit or at any arrow leading off the board’s edge.
There are a maximum of 25 zombies available for the Zombie Controller to have in the Maul at any one time. If there are not enough zombies available to take as reinforcements, those reinforcements are lost.
PLAYING ZOMBIE CARDS
Unless the card you wish to play says differently, the Zombie Controller may only play cards during his own turn. You may play any number of cards that you wish or you may opt to play no cards at all.
SPENDING ACTIONS
The Zombie Controller has 4 actions available per zombie per turn plus any cards which may increase the actions available.
The ZC may spend as many actions in a turn as you wish up to the maximum available.
He may not carry over actions from one turn to the next. ALL actions for one zombie are completed before moving onto the next zombie, then the next etc… The following
Move - By spending an action, a zombie may move one square in any direction; up, down, sideways or diagonal. Note: it is NOT permissible to move diagonally when moving around a corner or through a doorway. By spending two actions a zombie may move through a display window (designated by dashed lines)
It is permissible to move through a square containing another Zombie as long as the zombie does not end his turn in the square.
The only action a zombie may make while in a square containing another zombie is a move action. The ZC may never move a Zombie into a shopper’s square.
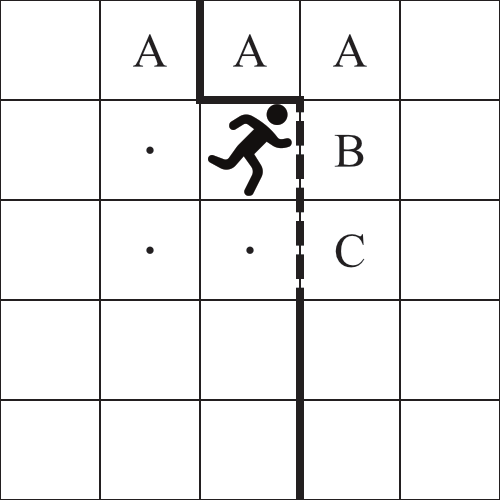
Moving to “A” is not allowed. Moving to “B” or “C” would take 2 actions. All other squares would require 1 action.
Attack - A zombie may use an action to make an attack on any one adjacent Shopper. The zombie may make a maximum of one attack per turn and it must be the last action used.
The Zombie Controller activates a zombie and spends two action moving the zombie next to a Shopper. He spends his 3rd action attacking the Shopper. His turn is now finished even though he has spent only 3 actions.
The base chance for a zombie attack to hit is the roll of a ‘6’ on a d6 (rigor mortis puts a crimp in throwing effective punches). Zombie Cards are the only thing which can increase the odds of hitting a Shopper. Zombies are not allowed to attack diagonally through a doorway or around a corner, or to attack through walls.
Zombies may attack through display windows with no penalty. Display windows are designated with a dashed border.
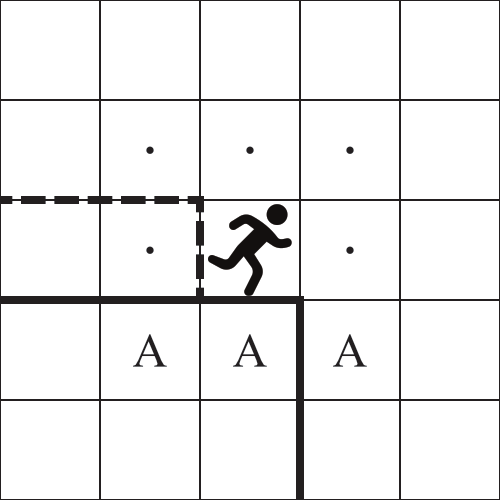
Attacking “A” is not allowed. All other adjacent squares are eligible to be hit.
KILLING SHOPPERS
If at anytime a Zombie causes a Shopper to sustain a 4th wound, the Shopper is dead (killed, KIA, toasties, wormfood, etc).
Being true to films, whenever a Shopper is killed, the Shopper token remains in place and joins the Living Dead under the control of the Zombie Controller for the remainder of the game. Beginning with the next Zombie Controller’s turn it is activated like any other zombie.
When a Shopper becomes a Zombie it may be attacked by other Shoppers from that point forward; it’s now just another Zombie.
If the Shopper/Zombie is killed by another Shopper, it may be brought back as a reinforcement or from a revealed Search card. Every Shopper turned into a Zombie adds one to the normal maximum of 25 zombies.
Two Shoppers have been Mauled and turned into Zombies. That means that the Zombie Controller now has 27 zombies available to use.
Escaping from the Maul of America
At any time a Shopper has enough equipment to escape (7 cards or one of each type of card) he is immediately eligible to escape from the Maul and must announce this to all other players. The Zombie Controller now designates the specific Maul exit the Shopper must exit from in order to win the game. The Zombie Controller may choose any entrance he desires, usually the entrance that would be the hardest for the Shopper to exit from. Here’s the catch:
Once the Zombie Controller has made her choice, that is the exit all Shoppers must escape from. Thereafter whenever a Shopper meets the criteria for escape he too will try to escape from the entrance already selected by the Zombie Controller. Remember, any arrow leading off the board counts as an exit for shoppers trying to escape from the mall.
If for any reason a Shopper who was previously eligible to escape finds himself not meeting the criteria for escape (such as using a Medkit to heal wounds), he is not allowed to escape until he once again meets the criteria for escape.
The two-hour time limit begins when the first Shopper begins his first turn and ends when the last Shopper takes his turn after the two hours have expired.
In a five player game (4 Shoppers, 1 Zombie Controller) time expires after Shopper 1 finishes his turn. The game won’t end until Shoppers 2, 3 and 4 finish their turns.
Special Cards
The following cards have special areas of effect and are included here for further explanation.
Sawed-off Shotgun
Any square partially touched is eligible to be hit.
Flame-Thrower
Any square partially touched is eligible to be hit.
Credits
- Game Design: Eric Canfield
- Game Development: Jim Dietz
- Playtesters: Curt Champeon, Chris Edmondson, Baron Heintz, Erik Johnson. David Pieart, Cory Poplett, Donna LeMaster Production Coordinator: Marc Miller and Heartland
- Publishing Rules: Eric Canfield
- Interior Art Conceptions: Jeremy Carlson
- Cover Art: Steve Bryant
- Maul Art: Eric Canfield
- Graphic Layout: Steve Bryant
Acknowledgements: The publishers would like to thank everyone involved in the publication of Maul of America. In addition, store names and card quotes are meant for parody and where they are real quotes, their source has been attributed.
MAUL OF AMERICA
Copyright © 1998, Jolly Roger Games, All Rights Reserved.
Printed in the USA. Made in the USA. No portion of this product may be reproduced without the permission of the publisher.
Cover Art Copyright 1998 Steve Bryant